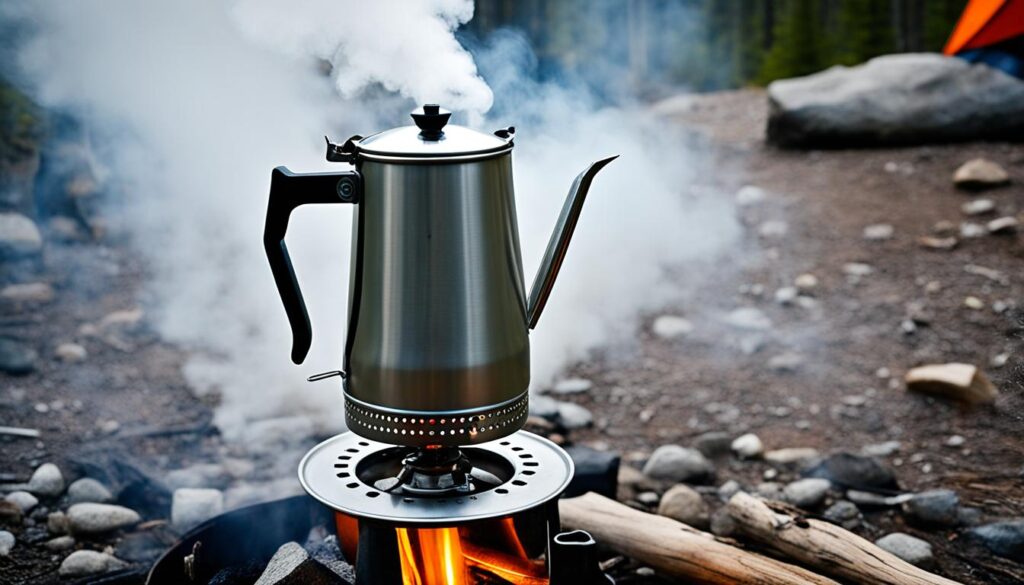
Are you a coffee lover who enjoys spending time in the great outdoors? If so, then a camping percolator is a must-have addition to your camping gear. With a camping percolator, you can enjoy a delicious cup of coffee even when you’re far from civilization. Let me guide you through the steps of using a camping percolator to brew the perfect cup of coffee on your next camping trip.
Using a camping percolator is simple and efficient. The process involves boiling water that is then pumped up through a central tube, flowing over coffee grounds and filtering back down, resulting in a flavorful cup of coffee. Follow these camping percolator instructions:
1. Start by pouring ground coffee into the filter basket. Be sure not to overfill it as this can lead to grounds in your coffee.
2. Heat water on a camp stove or campfire until it reaches the optimal brewing temperature — around 200 degrees Fahrenheit or 93 degrees Celsius.
3. Place the percolator on the heat source and allow it to percolate for a few minutes. The longer it percolates, the stronger the coffee will be.
4. Once the brewing is complete, carefully pour your coffee into a mug, being mindful not to disturb any settled grounds.
With these simple steps, you can enjoy a steaming cup of coffee while surrounded by nature. So, pack your camping percolator and start brewing your favorite coffee on your next camping adventure!
Key Takeaways:
- Using a camping percolator allows you to brew coffee while camping without electricity or special filters.
- Start by pouring ground coffee into the filter basket and heating water on a camp stove or campfire.
- Let the percolator percolate for a few minutes to achieve your desired coffee strength.
- Pour the brewed coffee into a mug, avoiding disturbing any settled grounds.
- Enjoy a flavorful cup of camping coffee and embrace the beauty of nature.
Contents
How to Choose the Best Camping Coffee Percolator
When it comes to brewing coffee outdoors, having the right camping coffee percolator is essential. Not only does it ensure a robust and flavorful cup of coffee, but it also enhances the overall camping experience. Here are some techniques to help you choose the best camping coffee percolator that suits your needs.
Consider the Size and Capacity
Take into account the number of people you need to serve and the amount of coffee you typically drink during your camping trips. Choose a percolator with a coffee pot size that can accommodate your requirements. Whether you’re brewing for just yourself or a larger group, having the right capacity ensures everyone gets their dose of caffeine for a great start to the day.
Pay Attention to Material Quality
Opt for a camping coffee percolator made of durable and heat-resistant materials. Avoid percolators with plastic components that could melt or deteriorate over a campfire. Look for options made from stainless steel or enamel-coated metal, which can withstand the ruggedness of outdoor use and maintain the flavor integrity of your coffee.
Choose Your Brewing Method
Consider whether you prefer a stovetop percolator or one specifically designed for use over a campfire. Stovetop percolators provide precise temperature control and are suitable for camping with access to a camp stove or portable burner. On the other hand, percolators designed for campfire use offer a more traditional and rustic brewing experience. Select a percolator that aligns with your preferred brewing method for the best camping coffee experience.

“Choosing the right camping coffee percolator can make all the difference in the quality of your coffee while enjoying the great outdoors.”
Brewing Coffee on a Campfire: Cowboy Coffee
Cowboy coffee is a simple and traditional method of making coffee while camping. It adds an authentic, rustic charm to your outdoor experience. All you need is some hot water, coffee grounds, a camping coffee pot or kettle, and a campfire. Let me walk you through the process of brewing delicious cowboy coffee.
What You’ll Need
- Camping coffee pot or kettle
- Coffee grounds
- Hot water
- Campfire
Now that you have all the necessary ingredients and equipment, let’s get started:
- Fill the camping coffee pot or kettle with water and place it over the campfire. Be careful not to overfill it to avoid any spills or accidents.
- Allow the water to heat up until it reaches a rolling boil. The boiling water is crucial for extracting the rich flavors from the coffee grounds.
- Once the water is boiling, add your preferred amount of coffee grounds directly into the pot or kettle. You can adjust the amount based on your taste preferences and the strength of coffee you desire.
- Let the coffee brew for a few minutes. This will allow the water to infuse with the coffee grounds and create a flavorful brew.
- After brewing, carefully remove the pot or kettle from the campfire. Let it sit for a moment to allow the coffee grounds to settle at the bottom.
- Now, it’s time to pour your freshly brewed cowboy coffee into mugs. Take extra care while pouring to avoid disturbing the settled grounds.
- Savor the aroma, taste, and warmth of your homemade campfire cowboy coffee. It’s a camping coffee hack that will fuel your outdoor adventures.
Remember, cowboy coffee is known for its simplicity and authenticity. However, because the coffee grounds are not filtered, there may be some sediment at the bottom of your cup. If you prefer a cleaner cup, you can use a fine-mesh strainer or a coffee filter to strain the coffee as you pour it into your mug.
So, the next time you’re out camping and want to enjoy a hot cup of coffee brewed over a campfire, give cowboy coffee a try. It’s a classic and straightforward method that will add a touch of nostalgia to your outdoor coffee experience.
Brewing Coffee with a Percolator
Using a percolator is another popular method of brewing coffee while camping. To use a percolator, follow these simple steps:
- Start by filling the bottom chamber of the percolator with cold water.
- Attach the percolator apparatus securely to the bottom chamber.
- Add coffee grounds to the filter basket, making sure not to overfill it. The recommended ratio is 1 tablespoon of coffee grounds per cup of water.
- Place the percolator on a camp stove or campfire, ensuring stability.
- Heat the percolator until the water reaches the optimal brewing temperature, which is around 200°F (93°C).
- Once the water boils, reduce the heat to maintain a gentle simmer. Let the percolator sputter for a few minutes, typically around 8-10 minutes.
- Remove the percolator from the heat and allow the grounds to settle at the bottom. This step is essential to prevent grounds from ending up in your cup.
- Carefully pour the brewed coffee into mugs or cups, using caution not to disturb the settled grounds.
A percolator can produce a rich and hearty cup of coffee, perfect for enjoying the great outdoors. Experiment with different coffee beans and brewing times to achieve your desired strength and flavor.
Tips for Percolator Coffee
- Choose freshly ground coffee beans for the best flavor.
- Grind the coffee beans to a medium-coarse consistency, similar to kosher salt.
- Avoid overfilling the filter basket with coffee grounds to prevent overflow during brewing.
- Adjust the brewing time to suit your preference. Longer brewing times result in a stronger, bolder flavor.
- Clean the percolator thoroughly after each use to maintain optimal performance.
Percolator coffee tips: Choosing the right grind size and controlling the brewing time are crucial for achieving a perfect cup of coffee with a percolator.

| Pros | Cons |
|---|---|
| Produces a robust and bold coffee flavor | Can sometimes result in over-extraction and bitterness |
| Durable and portable for camping adventures | Requires careful monitoring of brewing time and heat |
| No need for electricity or special filters | Can be challenging to control the strength of the brew |
Making Espresso Coffee While Camping
If you are an espresso lover, you don’t have to give up your favorite caffeine fix when camping. With the right coffee brewing equipment, you can enjoy a rich and concentrated cup of espresso even in the wilderness.
To make espresso coffee while camping, you will need an espresso pot specifically designed for use on a camp stove. These portable espresso pots are compact, lightweight, and easy to use. They allow you to recreate the authentic espresso brewing process outdoors.
Here’s how you can make espresso coffee while camping:
- Step 1: Fill the bottom chamber of the espresso pot with just-off-the-boil water. Be careful not to overfill it.
- Step 2: Fill the grounds basket of the espresso pot with fine ground coffee. Use coffee that is specifically labeled for espresso brewing.
- Step 3: Attach the grounds basket to the bottom chamber of the espresso pot.
- Step 4: Place the espresso pot on a camp stove over low-medium heat. Make sure the heat is distributed evenly.
- Step 5: Watch as the coffee slowly oozes into the upper chamber of the espresso pot. This process typically takes a few minutes.
- Step 6: Once the coffee turns a golden honey color and the upper chamber is full, remove the espresso pot from the heat.
- Step 7: Carefully pour the brewed espresso into cups or espresso shot glasses.
This method of making espresso coffee while camping allows you to enjoy a rich and intense flavor that espresso lovers appreciate. The portable espresso pot makes it convenient to bring the taste of your favorite coffee shop to the great outdoors.

With the aroma of freshly brewed espresso filling the campsite, you can savor your morning cup of joe while surrounded by nature’s beauty. Whether you’re embarking on a camping adventure or enjoying a peaceful retreat, making espresso coffee while camping adds an extra touch of luxury to your outdoor experience.
Other Ways to Make Coffee When Camping
In addition to using a percolator or making cowboy coffee or espresso, there are other methods you can use to make coffee while camping. These include using a camp French press or AeroPress, a single-serve coffee maker, or the pour-over method. Each method has its own advantages and produces a slightly different flavor profile.
When using a camp French press, simply add coffee grounds to the press, pour in hot water, and let it steep for a few minutes. Then, press down the plunger and pour the coffee into your mug.
The AeroPress is a compact and versatile coffee brewing device. It involves placing a filter and coffee grounds in the device, pouring in hot water, stirring, and then pressing the coffee through a filter into your cup.
For a single-serve option, you can use a camping coffee maker that uses individual coffee pods or capsules. Just insert the pod or capsule into the machine, add water, and press the brew button. This method is convenient and provides a quick and consistent cup of coffee.
The pour-over method, using a pour-over coffee maker or a cone dripper, allows you to brew coffee by pouring hot water over coffee grounds and letting it drip through a filter into your cup. It offers a customizable brewing process, allowing you to adjust the water flow rate and extraction time for a personalized coffee experience.
Experiment with different brewing methods to find the one that suits your taste preferences and camping style. Regardless of the method you choose, always bring high-quality coffee beans and fresh water to ensure the best cup of coffee while enjoying the great outdoors.
FAQ
How do I use a camping percolator?
To use a camping percolator, pour ground coffee into the filter basket and heat water on a camp stove or campfire. Let the percolator boil the water and brew the coffee for a few minutes. Carefully pour the brewed coffee into a mug and enjoy.
What should I consider when choosing a camping coffee percolator?
When choosing a camping coffee percolator, consider the size of the pot based on the number of people you need to serve. Also, pay attention to the materials used in the percolator and whether it is designed for use over a campfire or a stovetop.
How do I make cowboy coffee over a campfire?
To make cowboy coffee, heat water in a camping coffee pot or kettle over the campfire. Add coffee grounds directly to the pot and let it brew for a few minutes. Remove the pot from the heat, let the grounds settle, and carefully pour the coffee into mugs.
What is the process of brewing coffee with a percolator?
To brew coffee with a percolator, fill the bottom chamber with cold water and add coffee grounds to the filter basket. Place the percolator on a camp stove or campfire and let it heat until the water reaches the optimal brewing temperature. Once the water boils, reduce the heat and let the percolator sputter for a few minutes. Remove from the heat, let the grounds settle, and pour the brewed coffee into mugs.
How can I make espresso coffee while camping?
Use an espresso pot designed for use on a camp stove and fill the bottom chamber with just-off-the-boil water. Fill the grounds basket with fine ground coffee and attach it to the pot. Place the pot on low-medium heat and wait for the coffee to ooze into the upper chamber. Once it turns a golden honey color, remove from the heat and pour the espresso into cups.
What are some other methods of making coffee while camping?
Other methods include using a camp French press, AeroPress, single-serve coffee maker, or the pour-over method. Each method has its own advantages and produces a slightly different flavor profile. Experiment with different methods to find the one that suits your taste preferences and camping style.